Before making FileUp available to .NET applications, you must first start by following
the directions for installing FileUp for ASP.NET.
| Step 1: |
Add the appropriate FileUp dlls to the Global Assembly Cache (GAC) |
|
|
To make FileUp available to any .NET application, server-wide, add the following
dlls to the GAC.
- Open a command prompt window and move to the directory FileUp\Dotnet.
For example, enter cd Program Files\SoftArtisans\FileUp\Dotnet.
- Enter gacutil /i SAFileUp.dll.
- (Optional) If you chose to provide support for Progress Indication by registering
the SAPrgres.dll file in COM, you must also make this dll available to .NET:
Enter gacutil /i SAPrgres.dll.
- (Optional) It is recommended that your .NET FileUp application utilizes the HttpModule
to overcome .NET performance limitations. Make the HttpModule available by setting
up the FileUpModule.dll file in the GAC:
Enter gacutil /i FileUpModule.dll
|
| Step 2: |
Update the Machine.Config file. |
|
|
- Open the file machine.config (located in [Windows directory]\Microsoft.NET\Framework\
[.NET version directory]\CONFIG).
- Add the following lines to the assemblies node of machine.config:
<add assembly="SaFileUp, Version=v5.3.1,
Culture=neutral, PublicKeyToken=f593502af6ee46ae"/>
<add assembly="SAPrgres, Version=$fu.version.progress.build$,
Culture=neutral, PublicKeyToken=f593502af6ee46ae"/>
The version attribute must correspond exactly to the version
of SaFileUp.dll that you added to the GAC. To get the exact version of SaFileUp.dll,
right-click the file and select the Properties tab, and check the File version (not
the Product version).
|
- (Optional)If you chose to add support for the HttpModule, add the following line
to the httpHandlers node of machine.config:
<add verb="GET,HEAD,POST" path="*.uplx"

type="System.Web.UI.PageHandlerFactory" />
Add the line above to machine.config before these entries:
<add verb="GET,HEAD" path="*"

type="System.Web.StaticFileHandler" />
<add verb="*" path="*"

type="System.Web.HttpMethodNotAllowedHandler" />
- (Optional)If you chose to add support for the HttpModule, add the following to the
httpModules node of machine.config:
<add name="FileUpModule" type="SoftArtisans.Net.FileUpModule,

FileUpModule, Version=$fu.version.module.build$, Culture=neutral,

PublicKeyToken=f593502af6ee46ae"/>
The version attribute must correspond exactly to the version
of FileUpModule.dll that you added to the GAC. To get the exact version of FileUpModule.dll,
right-click the file and select the Properties tab, and check the File version (not
the Product version).
|
- (Optional) If you are using the 2.x version of the .NET Framework and you chose
to add support for the HttpModule, you must also add the following to machine.config:
<compilation>
<buildProviders>
<add extension=".uplx"
type="System.Web.Compilation.PageBuildProvider"/>
</buildProviders>
</compilation>
|
| Step 3: |
Instruct IIS to pass .uplx reqeusts to ASP.NET for processing. |
|
|
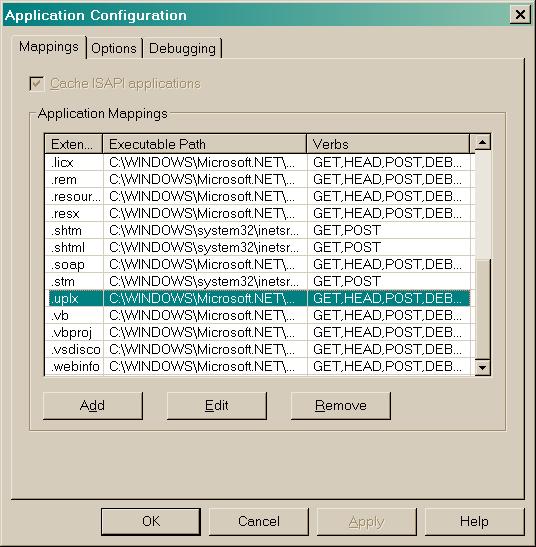
If you chose to add support for the HttpModule, you must also instruct IIS to allow
ASP.NET to process files with the .uplx extension. The HttpModule intercepts requests
to files with the extension .uplx. After a request is handled by the HttpModule,
the request needs to be forwarded to ASP.NET.
| In the Windows XP IIS console, the Web Sites and Web Site nodes have
identical properties dialogs. The script maps can be installed in the Web Sites
properties, but they will be ignored by IIS. The script maps must be installed
from the Web Site node.
|
|
Add .uplx to the Web Site's App Mappings
- Open IIS, right-click the Web Site, and select Properties.
- Select the Home Directory tab.
- Click Configuration.
- Select the App Mappings tab.
- Click Add.
- Browse to aspnet_isapi.dll (typically in [Windows directory]\Microsoft.NET\Framework\[.NET
version directory]\).
- In the Extension field, enter .uplx.
- Select All Verbs.
- Check Script Engine, and click Ok.
|
|
|
Properly configured application mappings for the .uplx extension:

|

